Hi all,
I had a problem that how to communicate with the xmpp server in Android. I firstly used the most powerful library smack for this purpose but with the passage of time I had come to know that it is not easy and not much flexible and it is good for the desktop or web applications. So, I started a research on the internet and at last I found the JXA library which is very light weight and more flexible than any other library.
Use this library and enjoy.
Tuesday, October 12, 2010
Tuesday, October 5, 2010
Android Screen Transitions
We can change the default transition in android but it is not necessary that our given transition apply every time. We should create some animation xml files and follow the steps below:
Steps to create activity transitions.
· Create a folder in the res folder.
· Named the new created folder as “anim”
· Put XMLs of animation in it.
· Call the following method of
o overridePendingTransition(R.anim.xml_file, R.anim.xml_file);
o first parameter is the start activity transitions and second is current activity.
o it should be call immediately after one of the flavors of startActivity(Intent) or finish() to specify an explicit transition animation to perform next.
· There are number of animations.
o Alpha
o Scale
o Rotate
Wednesday, September 22, 2010
Android File Upload
This is the code for upload the file from the android phone to php server.
public void upload(String fileName, String filePath, String strURL) {
if (fileName == null || fileName.equals("")) {
throw new RuntimeException("FileName cannot be empty");
}
if (filePath == null || filePath.equals("")) {
throw new RuntimeException("FilePath cannot be empty");
}
if (strURL == null || strURL.equals("") && !TextValidation.isValidURL(strURL)) {
throw new RuntimeException("Url cannot be empty");
}
// Get the file input stream
FileInputStream fis = setFile(filePath);
// indicator for the upload file white spaces
String lineEnd = "\r\n";
String twoHyphens = "--";
String boundary = "*****";
String exsistingFileName = fileName;
try {
// Http connection and parameter setting
URL connectURL = new URL(strURL);
HttpURLConnection conn = (HttpURLConnection) connectURL.openConnection();
conn.setDoInput(true);
conn.setDoOutput(true);
conn.setUseCaches(false);
conn.setRequestMethod("POST");
conn.setRequestProperty("Connection", "Keep-Alive");
conn.setRequestProperty("Content-Type", "multipart/form-data;boundary=" + boundary);
// Data Stream for sending file
DataOutputStream dos = new DataOutputStream(conn.getOutputStream());
dos.writeBytes(twoHyphens + boundary + lineEnd);
dos.writeBytes("Content-Disposition: form-data; name=\"userfile\";filename=\"" + exsistingFileName + "\"" + lineEnd);
dos.writeBytes(lineEnd);
int bytesAvailable = fis.available();
int maxBufferSize = 1024 * 1024;
int bufferSize = Math.min(bytesAvailable, maxBufferSize);
byte[] buffer = new byte[bufferSize];
int bytesRead = fis.read(buffer, 0, bufferSize);
// output stream populate
while (bytesRead > 0) {
dos.write(buffer, 0, bufferSize);
bytesAvailable = fis.available();
bufferSize = Math.min(bytesAvailable, maxBufferSize);
bytesRead = fis.read(buffer, 0, bufferSize);
}
// actual upload
dos.writeBytes(lineEnd);
dos.writeBytes(twoHyphens + boundary + twoHyphens + lineEnd);
// close the input stream
fis.close();
// flush the data output stream
dos.flush();
// response received
InputStream is = conn.getInputStream();
int ch;
StringBuffer b = new StringBuffer();
while ((ch = is.read()) != -1) {
b.append((char) ch);
}
Log.i("Response", ">" + b.toString());
} catch (Exception ex) {
Log.e("Exception", ">" + ex.toString());
throw new RuntimeException("Exception: " + ex.toString());
}
}
Wednesday, September 8, 2010
android voice recognition
If you are willing to develop a voice recognition system in the android phone, you will follow these steps:
create an activity.
create a button which launch the voice activity.
first you will get the package manager to find that the device has the ability to perform voice recognition.
PackageManager pm = getPackageManager();
Get the list from the package manager as:
List activities = pm.queryIntentActivities(new Intent(RecognizerIntent.ACTION_RECOGNIZE_SPEECH), 0);
check its size
activities.size() if it is greater than the zero then go for further processing.
Intent intent = new Intent(RecognizerIntent.ACTION_RECOGNIZE_SPEECH);
intent.putExtra(RecognizerIntent.EXTRA_LANGUAGE_MODEL,
RecognizerIntent.LANGUAGE_MODEL_FREE_FORM);
intent.putExtra(RecognizerIntent.EXTRA_PROMPT, "Speech recognition demo");
startActivityForResult(intent, VOICE_RECOGNITION_REQUEST_CODE);
this will launch the voice recognition activity and return a result.
Override this method
@Override
protected void onActivityResult(int requestCode, int resultCode, Intent data) {
if (requestCode == VOICE_RECOGNITION_REQUEST_CODE && resultCode == RESULT_OK) {
// Fill the list view with the strings the recognizer thought it could have heard
ArrayList matches = data.getStringArrayListExtra(
RecognizerIntent.EXTRA_RESULTS);
mList.setAdapter(new ArrayAdapter(this, android.R.layout.simple_list_item_1,
matches));
}
super.onActivityResult(requestCode, resultCode, data);
}
Full code of the application can be:
public class Main extends Activity implements OnClickListener{
private static final int VOICE_RECOGNITION_REQUEST_CODE = 1234;
private ListView mList;
@Override
public void onCreate(Bundle savedInstanceState) {
super.onCreate(savedInstanceState);
setContentView(R.layout.main);
Button speakButton = (Button) findViewById(R.id.btn_speak);
mList = (ListView) findViewById(android.R.id.list);
PackageManager pm = getPackageManager();
List activities = pm.queryIntentActivities(
new Intent(RecognizerIntent.ACTION_RECOGNIZE_SPEECH), 0);
if (activities.size() != 0) {
speakButton.setOnClickListener(this);
} else {
speakButton.setEnabled(false);
speakButton.setText("Recognizer not present");
}
}
public void onClick(View v) {
if (v.getId() == R.id.btn_speak) {
startVoiceRecognitionActivity();
}
}
private void startVoiceRecognitionActivity() {
Intent intent = new Intent(RecognizerIntent.ACTION_RECOGNIZE_SPEECH);
intent.putExtra(RecognizerIntent.EXTRA_LANGUAGE_MODEL,
RecognizerIntent.LANGUAGE_MODEL_FREE_FORM);
intent.putExtra(RecognizerIntent.EXTRA_PROMPT, "Speech recognition demo");
startActivityForResult(intent, VOICE_RECOGNITION_REQUEST_CODE);
}
@Override
protected void onActivityResult(int requestCode, int resultCode, Intent data) {
if (requestCode == VOICE_RECOGNITION_REQUEST_CODE && resultCode == RESULT_OK) {
// Fill the list view with the strings the recognizer thought it could have heard
ArrayList matches = data.getStringArrayListExtra(
RecognizerIntent.EXTRA_RESULTS);
mList.setAdapter(new ArrayAdapter(this, android.R.layout.simple_list_item_1,
matches));
}
super.onActivityResult(requestCode, resultCode, data);
}
}
Please comment if you have any problem in this code.
create an activity.
create a button which launch the voice activity.
first you will get the package manager to find that the device has the ability to perform voice recognition.
PackageManager pm = getPackageManager();
Get the list from the package manager as:
List
check its size
activities.size() if it is greater than the zero then go for further processing.
Intent intent = new Intent(RecognizerIntent.ACTION_RECOGNIZE_SPEECH);
intent.putExtra(RecognizerIntent.EXTRA_LANGUAGE_MODEL,
RecognizerIntent.LANGUAGE_MODEL_FREE_FORM);
intent.putExtra(RecognizerIntent.EXTRA_PROMPT, "Speech recognition demo");
startActivityForResult(intent, VOICE_RECOGNITION_REQUEST_CODE);
this will launch the voice recognition activity and return a result.
Override this method
@Override
protected void onActivityResult(int requestCode, int resultCode, Intent data) {
if (requestCode == VOICE_RECOGNITION_REQUEST_CODE && resultCode == RESULT_OK) {
// Fill the list view with the strings the recognizer thought it could have heard
ArrayList
RecognizerIntent.EXTRA_RESULTS);
mList.setAdapter(new ArrayAdapter
matches));
}
super.onActivityResult(requestCode, resultCode, data);
}
Full code of the application can be:
public class Main extends Activity implements OnClickListener{
private static final int VOICE_RECOGNITION_REQUEST_CODE = 1234;
private ListView mList;
@Override
public void onCreate(Bundle savedInstanceState) {
super.onCreate(savedInstanceState);
setContentView(R.layout.main);
Button speakButton = (Button) findViewById(R.id.btn_speak);
mList = (ListView) findViewById(android.R.id.list);
PackageManager pm = getPackageManager();
List
new Intent(RecognizerIntent.ACTION_RECOGNIZE_SPEECH), 0);
if (activities.size() != 0) {
speakButton.setOnClickListener(this);
} else {
speakButton.setEnabled(false);
speakButton.setText("Recognizer not present");
}
}
public void onClick(View v) {
if (v.getId() == R.id.btn_speak) {
startVoiceRecognitionActivity();
}
}
private void startVoiceRecognitionActivity() {
Intent intent = new Intent(RecognizerIntent.ACTION_RECOGNIZE_SPEECH);
intent.putExtra(RecognizerIntent.EXTRA_LANGUAGE_MODEL,
RecognizerIntent.LANGUAGE_MODEL_FREE_FORM);
intent.putExtra(RecognizerIntent.EXTRA_PROMPT, "Speech recognition demo");
startActivityForResult(intent, VOICE_RECOGNITION_REQUEST_CODE);
}
@Override
protected void onActivityResult(int requestCode, int resultCode, Intent data) {
if (requestCode == VOICE_RECOGNITION_REQUEST_CODE && resultCode == RESULT_OK) {
// Fill the list view with the strings the recognizer thought it could have heard
ArrayList
RecognizerIntent.EXTRA_RESULTS);
mList.setAdapter(new ArrayAdapter
matches));
}
super.onActivityResult(requestCode, resultCode, data);
}
}
Please comment if you have any problem in this code.
Tuesday, September 7, 2010
Event Handling in Android
There are many events in android which can be handle through code but I am currently go with onClickListener.
As you know that all events are listen through a listener and we will work with OnClickListener.
You have a button in xml layout and you are accessing it with the code:
Button myBtn = (Button) findViewById(R.id.my_button);
Now we are register a listener with it as
myBtn.setOnClickListener(new MyListener ());//Object_of_OnClickListener_class
Now I am going to develop a class which will be implement OnClickListener which is member of android.view.View.OnClickListener.
Import android.view.View.OnClickListener;
public class MyListener implements OnClickListener{
public void onClick(View v) {
//your action
}
}
Now write your logic for your action.
Practice it and let me know if you have any problem.
Thursday, September 2, 2010
Androd Alert Dialog
Now you are familiar with the code and activity of the android.
We are going to write a code for the AlertDialog here to show the dialog box.
In your activity go to the onCreate method and paste the following code in the last of the method.
new AlertDialog.Builder(AddVisit.this)
.setTitle("My Alert Title")
.setMessage("My dialog message body")
.setNeutralButton("OK", new DialogInterface.OnClickListener() {
@Override
public void onClick(DialogInterface dialog, int which) {
// TODO Auto-generated method stub
}
})
.show();
After inserting this code you will see the dialog.
Monday, August 16, 2010
use xml Layout in android activity
Now you are familiar with the HelloWorld application in Android. Now I want to use xml Layouts in my activities.
1. You will create a helloworld application with your desire name.
2. Open the res>layout node.
3. Double click on main.xml file.
4. It will be open in right pane of the eclipse.
5. You will see the tag with linear layout option.
6. After this tag you will find the TextView tag.
7. You will change its text property as "Enter Name".
8. After the closing bracket </TextView> You press Enter.
9. And put <EditText android:layout_height="wrap_content" android:layout_width="fill_parent"> </EditText>
10. Above line of code create a Text Field for enter the text.
11. Now, enter the text <Button android:layout_height="wrap_content" android:layout_width="fill_parent" android:text="Login"></Button>
12. Now, Run the application in Android Emulator.
13. You will see the login screen.
The full code of the main.xml is as follow:
<?xml version="1.0" encoding="utf-8"?>
<LinearLayout xmlns:android="http://schemas.android.com/apk/res/android"
android:orientation="vertical"
android:layout_width="fill_parent"
android:layout_height="fill_parent"
>
<TextView
android:layout_width="fill_parent"
android:layout_height="wrap_content"
android:text="Enter Name"
/>
<EditText
android:layout_width="fill_parent"
android:layout_height="wrap_content"
/>
<Button
android:layout_width="fill_parent"
android:layout_height="wrap_content"
android:text="Login"
/>
</LinearLayout>

Tuesday, August 10, 2010
Wednesday, July 21, 2010
Android directory and file structure
It is introduction of the eclipse project explorer directory structures.
- "src" this is abbreviation of source. This folder contains, in fact, the java source files and packages.
- "gen" is automatically generated folder and we must not need to edit its files and packages. It contains the auto generated file "R.java" which is generated and updated by eclipse.
- "assets" contains the image, video and sound files for the application usage.
- "res" contains different folders.
- "drawable-hdpi" is the high dip devices images and drawable stuffs.
- "drawable-ldpi" and "drawable-mdpi" same as "drawable-hdpi" but these are used for the low dpi and medium dpi devices.
- "layout" contains the xml layout for the screens (Activities).
- "values" contains the strings.xml and style files.
- "AndroidManifest.xml" contains the meta-data of the application. Like activity list, theme on application level or activity level, application level settings, permissions, and instructions.
HelloWorld in Android
Now we are able to write a hello world application in Android. It is quite easy but it will create confidence in you. One you run an application you will be come more confident and trying to do some thing new in it. Please correct me if I am wrong in any place. Your comments are precious for me.
- Press "New>Projects...".
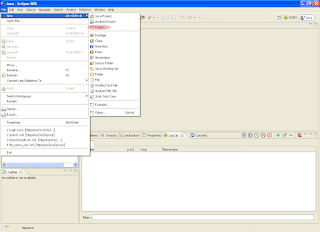
- Select "Android>Android Project" node.
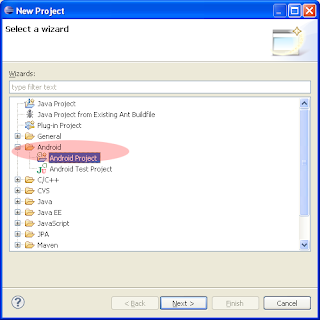
- Press Next button.
- A new dialog box open.
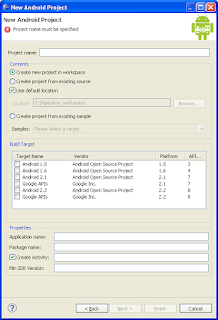
- Give Project name as "HelloWorld". Application name as "HelloWorld". Select desire SDK. Give package name like "com.my.app". First Activity Name like "MyActivity". Leave Min SDK version.
- Finish Button will be enabled. Press finish button.
- In left pane your application node will be appear.

- Right click on it and select "Run As>Android Application".

- Wait for load android AVD and its starting. As its Start your application show a screen with the message "Hello World". :)


Create AVD
I am share my knowledge on this blog, if anybody find something wrong please comment me, so I am able to improve myself and other my blog viewers.
In this lesson we will create an AVD (Android Virtual Device from the Eclipse IDE).
In this lesson we will create an AVD (Android Virtual Device from the Eclipse IDE).
- Select AVD icon from the toolbar of the eclipse IDE.

- A dialog box will be opened. This is called AVD Manager.

- Press New button on it.
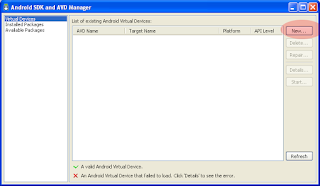
- A new dialog will be opened with caption "Create New AVD".
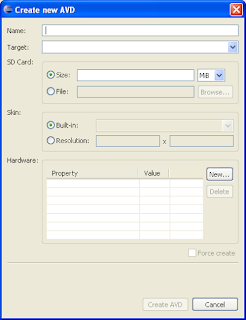
- Write its name, its your choice, select SDK version, SD card size, may be 10, and select your desire resolution.
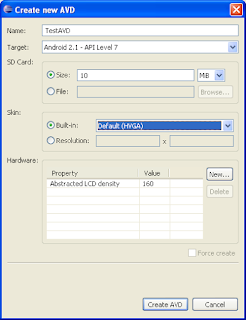
- Press Create AVD Button and your AVD is created.


Monday, July 19, 2010
Android-Eclipse: Setup
1- You can download eclipse. It is open source tool for Java development.
2- Unpack the downloaded archive in your favorite path.
3- Install jdk1.5 or later from java
4- Download Android latest SDK.
5- Install android plug in for eclipse using following steps.
6- Start Eclipse from the eclipse.exe under your unpack folder of eclipse.
7-
8-
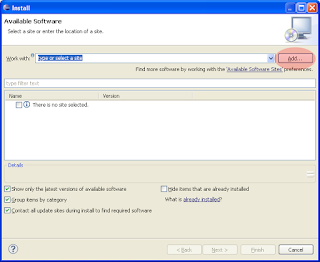
9- Press "Add" Button.
10-
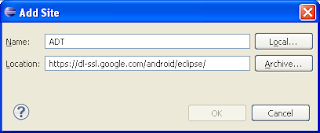
11- Enter the name what do you want, and location as "https://dl-ssl.google.com/android/eclipse/" or if it not work try this "http://dl-ssl.google.com/android/eclipse/"
12-
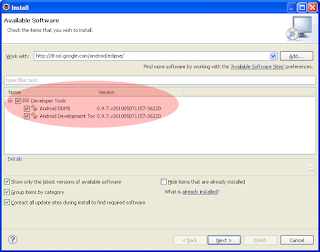
13- Press Next and again Next.
14-
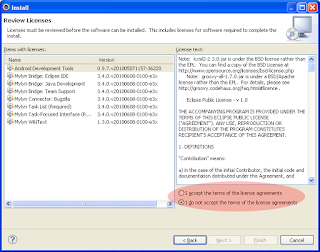
15-- Accept the terms and press finish button.
16-It will start download the plug in.
17- As download is complete you have to set the path of the SDK as follow:
18- Unpack the downloaded SDK and open eclipse.
19-
20-
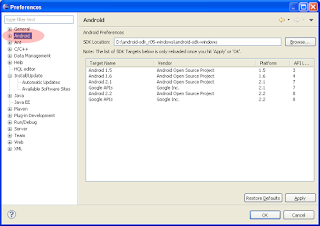
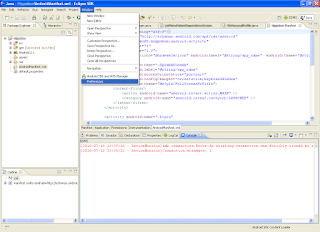
20- As you will select 'Android' node your dialog right pane has an empty field named "SDK Location". Write your correct unpack SDK path here.
Congratulation your System is ready for the Android Development.
2- Unpack the downloaded archive in your favorite path.
3- Install jdk1.5 or later from java
4- Download Android latest SDK.
5- Install android plug in for eclipse using following steps.
6- Start Eclipse from the eclipse.exe under your unpack folder of eclipse.
7-

8-

9- Press "Add" Button.
10-

11- Enter the name what do you want, and location as "https://dl-ssl.google.com/android/eclipse/" or if it not work try this "http://dl-ssl.google.com/android/eclipse/"
12-

13- Press Next and again Next.
14-

15-- Accept the terms and press finish button.
16-It will start download the plug in.
17- As download is complete you have to set the path of the SDK as follow:
18- Unpack the downloaded SDK and open eclipse.
19-

20-

20- As you will select 'Android' node your dialog right pane has an empty field named "SDK Location". Write your correct unpack SDK path here.
Congratulation your System is ready for the Android Development.
Subscribe to:
Posts (Atom)