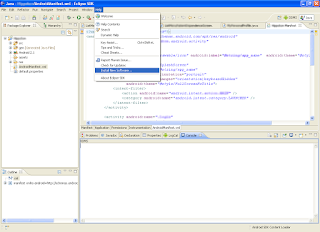
- "src" this is abbreviation of source. This folder contains, in fact, the java source files and packages.
- "gen" is automatically generated folder and we must not need to edit its files and packages. It contains the auto generated file "R.java" which is generated and updated by eclipse.
- "assets" contains the image, video and sound files for the application usage.
- "res" contains different folders.
- "drawable-hdpi" is the high dip devices images and drawable stuffs.
- "drawable-ldpi" and "drawable-mdpi" same as "drawable-hdpi" but these are used for the low dpi and medium dpi devices.
- "layout" contains the xml layout for the screens (Activities).
- "values" contains the strings.xml and style files.
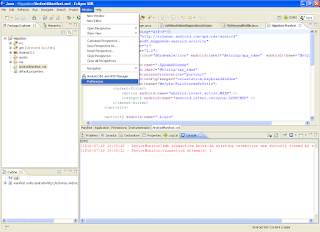
- "AndroidManifest.xml" contains the meta-data of the application. Like activity list, theme on application level or activity level, application level settings, permissions, and instructions.
Wednesday, July 21, 2010
Android directory and file structure
It is introduction of the eclipse project explorer directory structures.
HelloWorld in Android
Now we are able to write a hello world application in Android. It is quite easy but it will create confidence in you. One you run an application you will be come more confident and trying to do some thing new in it. Please correct me if I am wrong in any place. Your comments are precious for me.
- Press "New>Projects...".

- Select "Android>Android Project" node.

- Press Next button.
- A new dialog box open.

- Give Project name as "HelloWorld". Application name as "HelloWorld". Select desire SDK. Give package name like "com.my.app". First Activity Name like "MyActivity". Leave Min SDK version.
- Finish Button will be enabled. Press finish button.
- In left pane your application node will be appear.

- Right click on it and select "Run As>Android Application".

- Wait for load android AVD and its starting. As its Start your application show a screen with the message "Hello World". :)


Create AVD
I am share my knowledge on this blog, if anybody find something wrong please comment me, so I am able to improve myself and other my blog viewers.
In this lesson we will create an AVD (Android Virtual Device from the Eclipse IDE).
In this lesson we will create an AVD (Android Virtual Device from the Eclipse IDE).
- Select AVD icon from the toolbar of the eclipse IDE.

- A dialog box will be opened. This is called AVD Manager.

- Press New button on it.

- A new dialog will be opened with caption "Create New AVD".

- Write its name, its your choice, select SDK version, SD card size, may be 10, and select your desire resolution.

- Press Create AVD Button and your AVD is created.


Monday, July 19, 2010
Android-Eclipse: Setup
1- You can download eclipse. It is open source tool for Java development.
2- Unpack the downloaded archive in your favorite path.
3- Install jdk1.5 or later from java
4- Download Android latest SDK.
5- Install android plug in for eclipse using following steps.
6- Start Eclipse from the eclipse.exe under your unpack folder of eclipse.
7-
8-
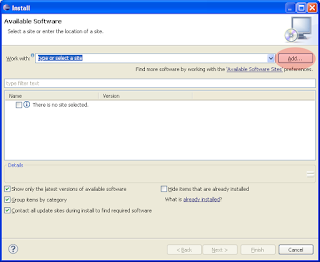
9- Press "Add" Button.
10-
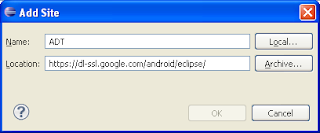
11- Enter the name what do you want, and location as "https://dl-ssl.google.com/android/eclipse/" or if it not work try this "http://dl-ssl.google.com/android/eclipse/"
12-
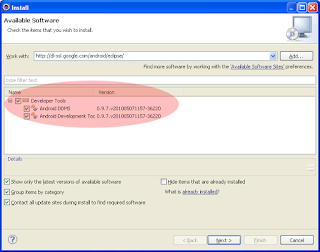
13- Press Next and again Next.
14-
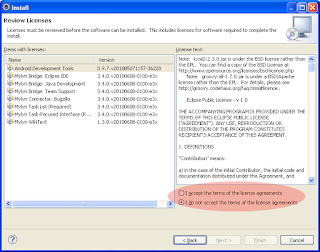
15-- Accept the terms and press finish button.
16-It will start download the plug in.
17- As download is complete you have to set the path of the SDK as follow:
18- Unpack the downloaded SDK and open eclipse.
19-
20-
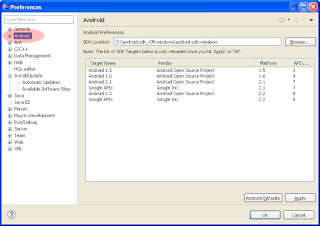
20- As you will select 'Android' node your dialog right pane has an empty field named "SDK Location". Write your correct unpack SDK path here.
Congratulation your System is ready for the Android Development.
2- Unpack the downloaded archive in your favorite path.
3- Install jdk1.5 or later from java
4- Download Android latest SDK.
5- Install android plug in for eclipse using following steps.
6- Start Eclipse from the eclipse.exe under your unpack folder of eclipse.
7-

8-

9- Press "Add" Button.
10-

11- Enter the name what do you want, and location as "https://dl-ssl.google.com/android/eclipse/" or if it not work try this "http://dl-ssl.google.com/android/eclipse/"
12-

13- Press Next and again Next.
14-

15-- Accept the terms and press finish button.
16-It will start download the plug in.
17- As download is complete you have to set the path of the SDK as follow:
18- Unpack the downloaded SDK and open eclipse.
19-

20-

20- As you will select 'Android' node your dialog right pane has an empty field named "SDK Location". Write your correct unpack SDK path here.
Congratulation your System is ready for the Android Development.
Subscribe to:
Posts (Atom)